
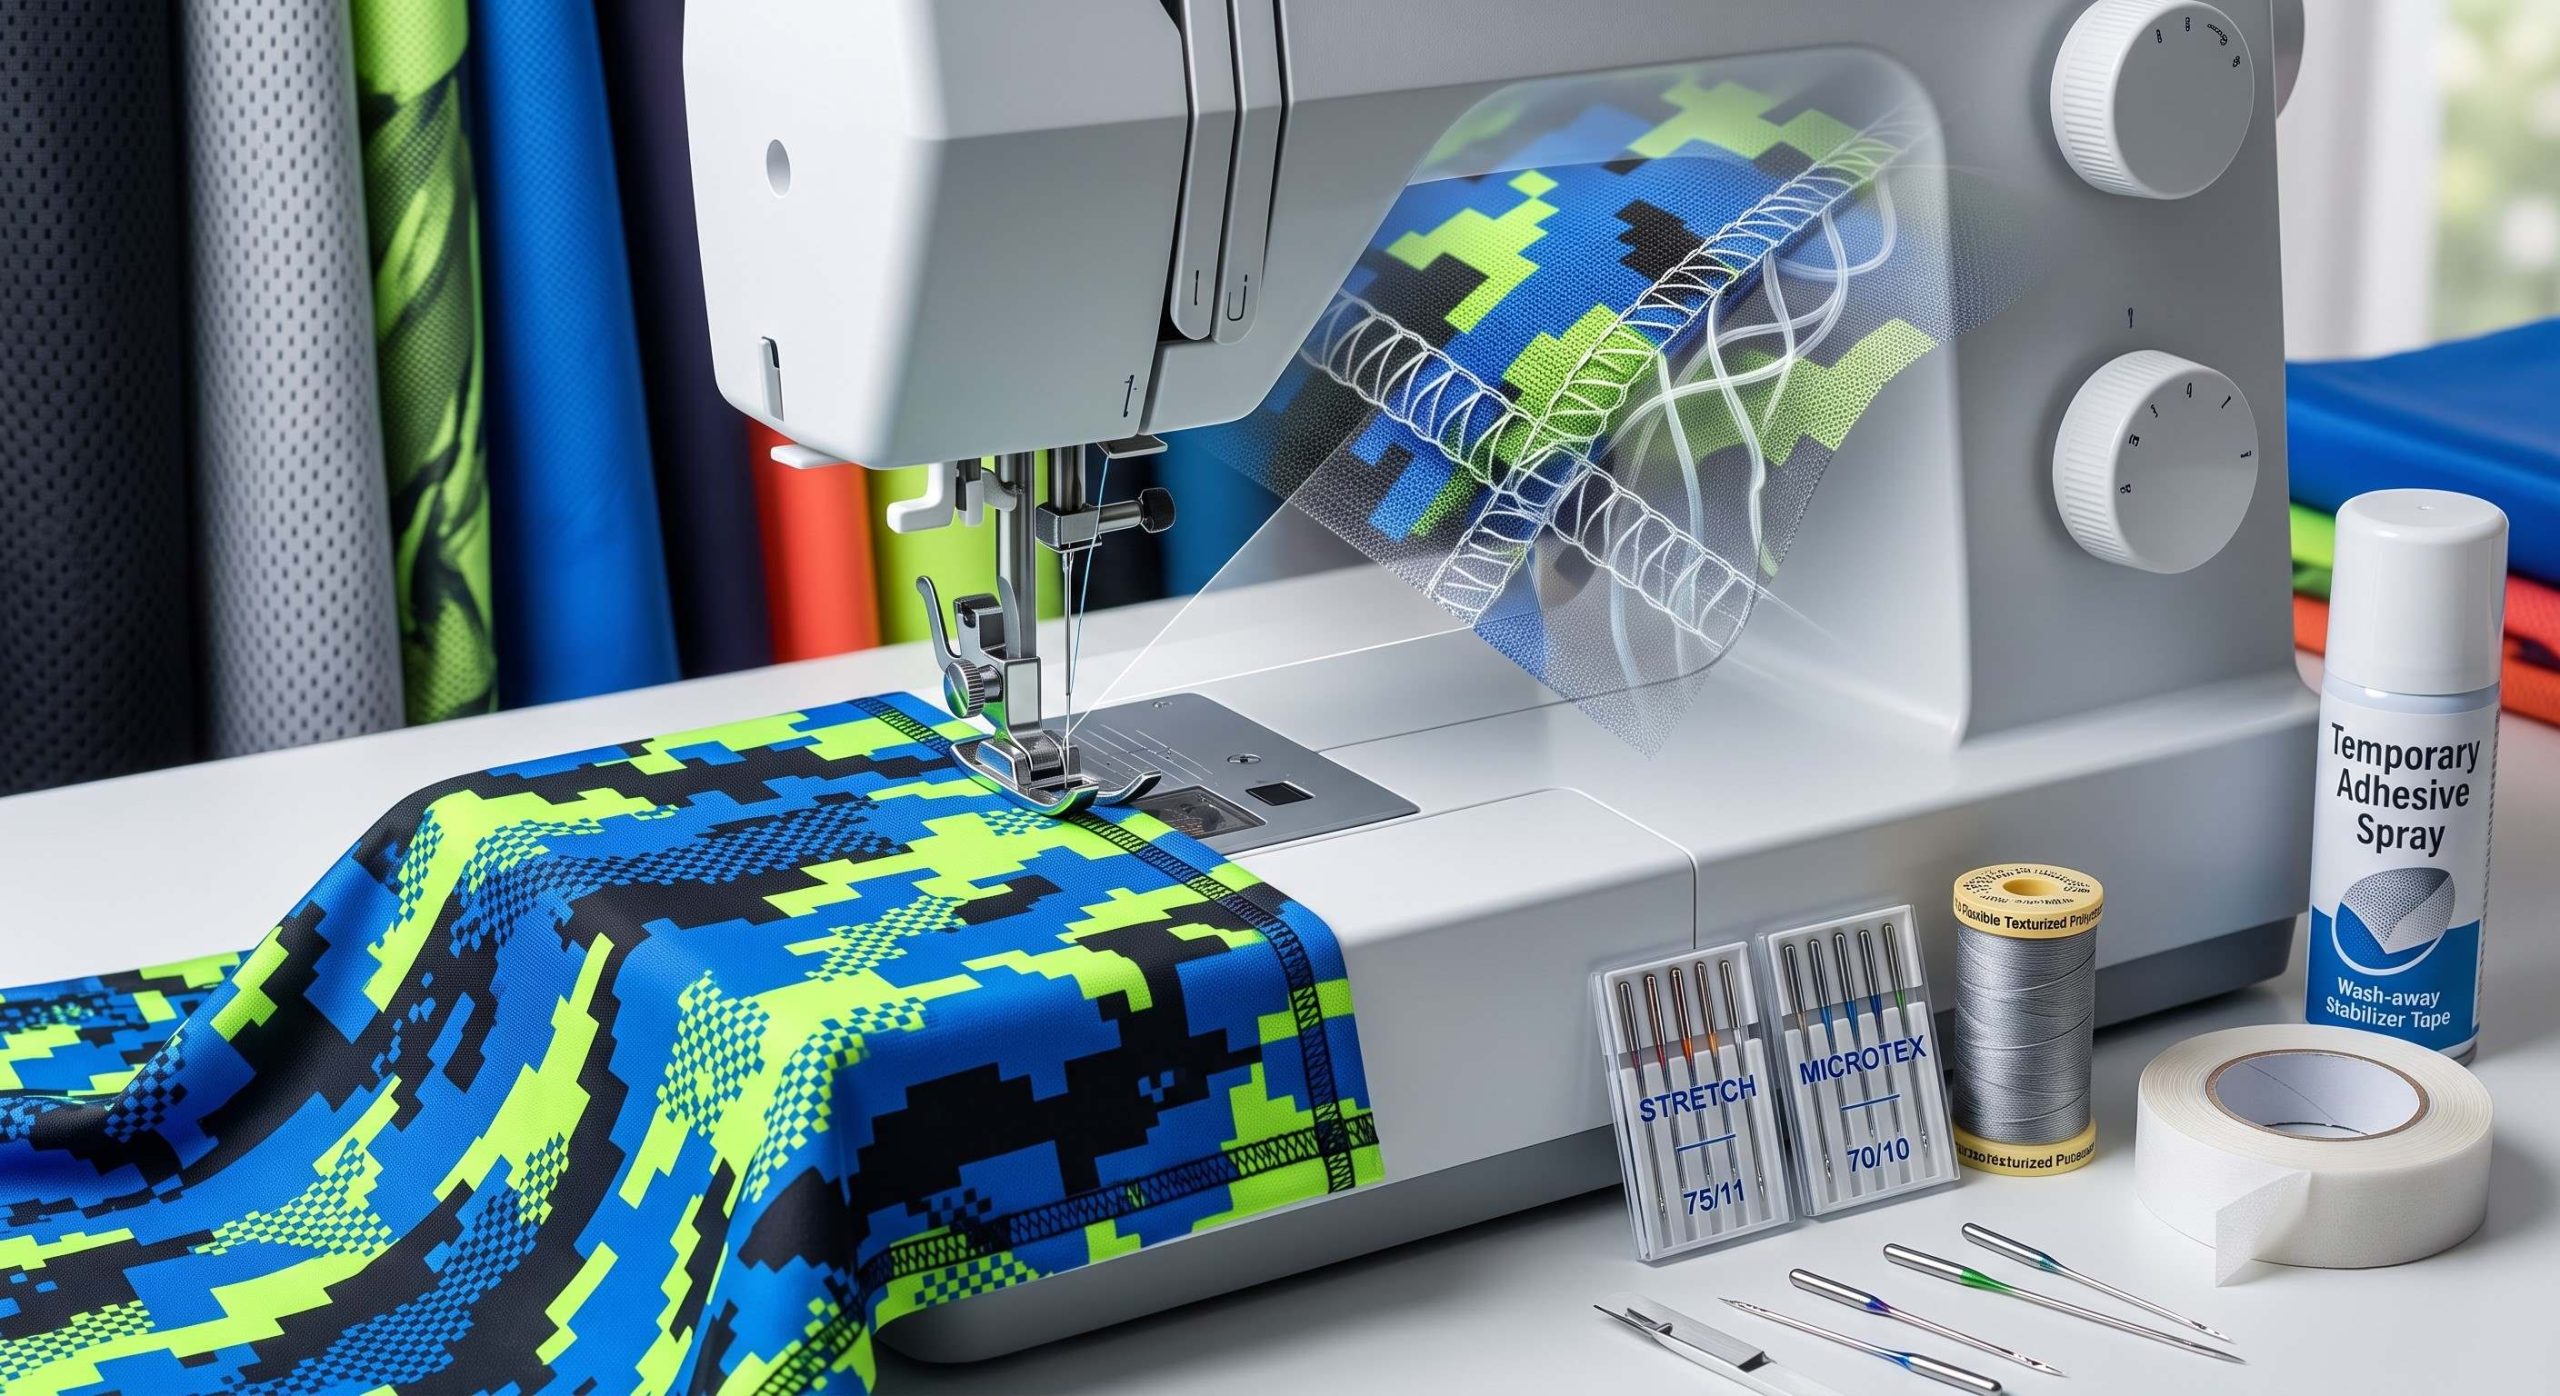
Your Complete Guide to Sewing with Sports Fabric
Sewing high-performance activewear successfully requires a complete understanding of how synthetic knit fibers behave under a needle. You might be wondering if your standard household setup can handle slippery, high-stretch materials without causing skipped stitches or structural failures. The answer is a definitive yes, provided you adapt your tools and techniques to match the unique mechanical properties of modern synthetic textiles. Business buyers and production managers must master these technical adjustments to minimize product defects, maximize factory efficiency, and ensure that finished garments withstand extreme physical stress.
Our extensive background in manufacturing high-grade sports fabric material establishes the technical foundation for this comprehensive assembly guide.
1. Why Does Sports Fabric Material Require Special Needles?
An incorrect needle choice will pierce and shred delicate synthetic filaments instead of sliding cleanly between them. Here is the deal: universal needles feature a slightly sharp point designed primarily for woven goods, which cuts through elastic fibers and creates microscopic holes that eventually bloom into structural runs. Utilizing a ballpoint or stretch needle ensures that the rounded tip deflects off the synthetic yarn, preserving the structural integrity of your sports fabric material during high-speed production cycles.
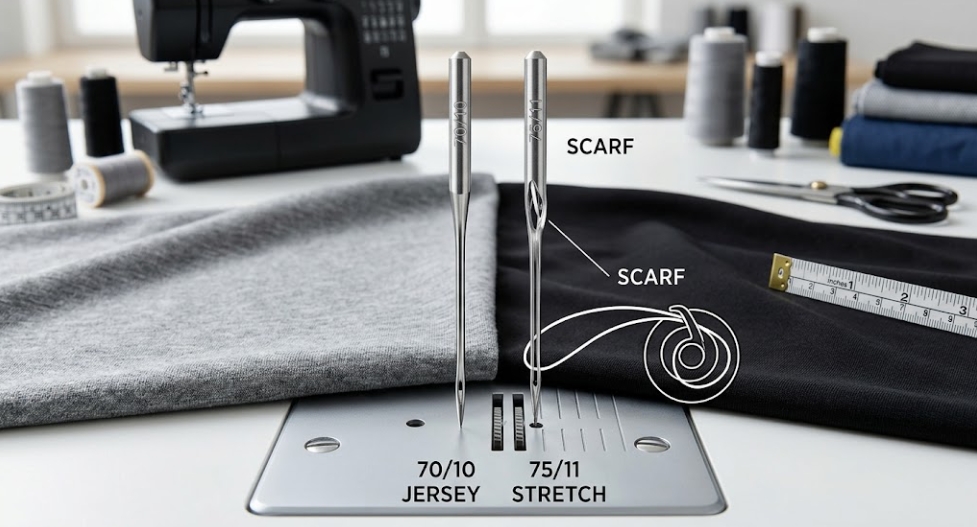
Selecting Jersey vs Stretch Needles
Jersey needles feature a medium ballpoint design optimized for standard cotton knits, whereas stretch needles incorporate a unique scarf configuration that prevents skipped stitches on highly elastic synthetics like spandex. What’s the real story? The specialized scarf creates a larger loop for the bobbin hook to catch, which eliminates skipped stitches entirely when assembling technical apparel.
- Use jersey ballpoint tips for stable, medium-weight interlock fabrics.
- Deploy specialized stretch needles when sewing high-elasticity Lycra blends.
- Match needle sizes 70/10 to 80/12 for optimal performance.
Microtex Needles for Microfibers
Fine, tightly woven synthetic microfibers like premium windbreaker shells require a radically different approach to prevent unsightly puckering along the seam line. Sharp Microtex needles feature a slim, acute point that pierces dense matrices effortlessly without deflecting or distorting the surrounding weave structure.
- Select Microtex needles for tightly woven nylon or polyester outerwear.
- Change needles every four hours of continuous sewing time.
Key Takeaway: Needle Selection Impact
Choosing the exact needle configuration prevents fabric damage and eliminates costly machine downtime caused by skipped stitches or broken threads.
| Fabric Variety | Recommended Needle Type | Optimal Needle Size |
| High-Stretch Spandex | Stretch Needle | 75/11 |
| Polyester Interlock | Ballpoint / Jersey | 80/12 |
| Dense Microfiber | Microtex Sharp | 70/10 |
Evaluating your needle geometry prior to production runs ensures clean penetration and eliminates micro-tears along high-stress structural seams.
2. How Do You Prevent Seams from Snapping on Stretch Items?
Straight stitches possess zero inherent elasticity, meaning they will snap instantly the moment an athlete expands the garment. Ready for the good part? Ensuring seam durability requires utilizing machine settings and thread selections that allow the stitched seam line to expand in perfect unison with your sports fabric material. Production managers must configure equipment to inject extra thread volume into each seam matrix, creating a mechanical reserve that absorbs high tensile loads without tearing.
Implementing Triple Stretch Stitches
The triple stretch stitch moves the needle forward, backward, and forward again, embedding three parallel threads into a single stitch line to deliver maximum reinforcement. This is where it gets interesting because this setting provides incredible strength for high-stress zones like crotch seams and armscyes while maintaining excellent linear flexibility.
- Configure machine settings to a narrow zigzag or dedicated triple stretch.
- Ensure backstitching is minimized to prevent thread jamming in feed dogs.
- Maintain a stitch length between 2.5mm and 3.0mm for optimal elasticity.
Utilizing Flexible Polyester Thread
Standard cotton thread lacks the required elongation properties and chemical resistance needed for high-performance athletic apparel applications. Premium polyester thread offers exceptional tensile strength, chemical stability against laundry detergents, and a minor degree of natural elasticity that complements synthetic textiles perfectly.
- Utilize texturized polyester threads in looper mechanisms for softer seams.
- Avoid vintage cotton threads which degrade rapidly under heavy perspiration.
Key Takeaway: Seam Elasticity Rules
Matching seam elasticity to fabric stretch prevents premature garment failure and significantly boosts overall product durability during intense athletic activities.
| Stitch Configuration | Elasticity Rating | Primary Application Zone |
| Narrow Zigzag (0.5mm width) | Medium-High | Side Seams, Sleeves |
| Triple Stretch Stitch | Maximum | Crotch Seams, Active Armscyes |
| Standard Straight Stitch | Zero | Non-Stretch Stabilized Facings |
Configuring proper stitch architecture guarantees that the finished garment maintains its shape without structural seam failure under maximum elongation.
3. Can You Sew High Quality Activewear on a Regular Machine?
A specialized industrial serger is not an absolute requirement for creating durable, market-ready athletic garments. You might be wondering if a standard lockstitch machine can produce professional results that meet strict B2B quality metrics. By utilizing specific utility stitches and adjusting mechanical parameters, standard sewing units can replicate the flexibility and clean edge finishing of commercial industrial equipment quite effectively.
Simulating Serger Overlock Stitches
Most modern sewing units include a built-in overcast or mock-overlock stitch designed to sew a seam and finish the raw edge simultaneously. Here’s the deal: this stitch mirrors an industrial serger by casting thread over the fabric edge, trapping loose synthetic filaments securely.
- Attach an overcasting foot to guide raw edges evenly along the stitch.
- Trim excess seam allowances cleanly before applying the overcasting sequence.
- Test stitch width settings to prevent fabric edges from curling inward.
Adjusting Presser Foot Pressure
Heavy presser foot factory calibrations will stretch out elastic knit panels before the needle can pierce them, resulting in wavy, distorted seams. Reducing the presser foot pressure allows the top and bottom layers of your sports fabric material to feed evenly through the machine without elongation.
- Decrease pressure settings by 30% when handling highly elastic knits.
- Use a walking foot attachment to equalize top and bottom fabric feeding.
Key Takeaway: Standard Machine Adaptation
Adjusting mechanical settings allows standard lockstitch machines to process complex technical textiles efficiently without requiring expensive machinery investments.
| Machine Modification | Technical Function | Production Benefit |
| Walking Foot Installation | Equalizes dual-layer fabric feeding | Eliminates wavy, distorted seam lines |
| Overcast Utility Stitch | Encapsulates raw edge fibers | Replicates industrial serger aesthetics |
| Pressure Reduction | Eases downward clamping force | Prevents fabric stretching during feeding |
Fine-tuning your existing machinery parameters unlocks excellent production versatility while maintaining strict quality control over flexible garment assemblies.
4. What Is the Best Way to Handle Slippery Synthetic Edges?
Slippery performance synthetics often shift, slip, and misalign during high-speed production feeding. But here’s the kicker—even a minor 2mm misalignment at the start of a seam can result in significant panel distortion by the time you reach the end. Controlling these active materials requires implementing temporary stabilization techniques that lock the layers together without permanently altering the hand or elasticity of your sports fabric material.
Stabilizing Mesh and Lycra Swatches
Applying specialized wash-away or tear-away stabilizers along the seam path provides a temporary rigid matrix that guides slippery edges smoothly past the feed dogs. What’s the real story? This technique prevents thin mesh structures from being forced down into the throat plate hole during initial needle penetration.
- Sandwich ultra-light mesh edges between strips of water-soluble stabilizer tape.
- Avoid utilizing heavy tear-away stabilizers that leave fibrous residue behind.
- Ensure stabilizers are completely removed before packing finished garments.
Utilizing Temporary Fabric Adhesive
Temporary fabric adhesive sprays or double-sided wash-away basting tapes hold complex panel curves together far more securely than traditional metal pins. Pins tend to distort knit structures and create localized puckering, whereas adhesives distribute holding forces evenly across the entire surface.
- Apply adhesive sparingly to avoid gumming up high-speed sewing needles.
- Select water-soluble formulas that dissolve completely during the first laundry wash.
Key Takeaway: Edge Distortion Defense
Temporary stabilization eliminates structural misalignment and ensures precise pattern matching across complex multi-panel sportswear designs.
| Stabilization Method | Material Focus | Removal Process |
| Water-Soluble Basting Tape | Sheer Mesh, Slippery Lycra | Dissolves instantly in warm water |
| Temporary Spray Adhesive | Large Panel Overlays | Evaporates or washes out completely |
| Tissue Paper Strips | Budget Polyester Knits | Tears away manually post-stitching |
Deploying reliable stabilization workflows optimizes manufacturing accuracy and minimizes material waste caused by panel distortion.
5. How Do Advanced Fixatives Stop Sports Fabric Material Bleeding?
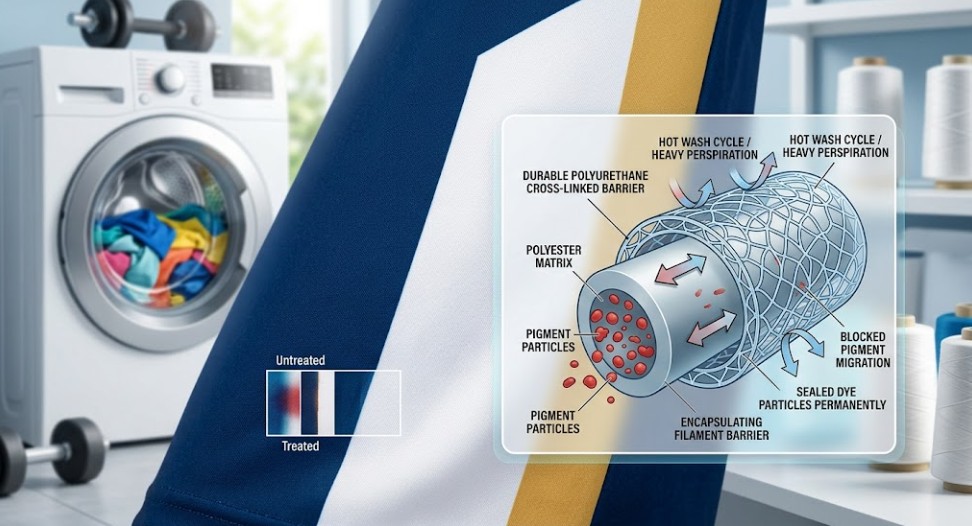
Advanced chemical fixatives stop color bleeding by creating a durable polyurethane cross-linked barrier that encapsulates individual synthetic filaments to seal loose dye particles permanently. This protective barrier blocks the migration of pigments out of the polyester matrix during hot washing machine cycles or heavy perspiration. Utilizing high-grade sports fabric material that has undergone this treatment protects white panels from catching adjacent dark dyes. The chemical bond ensures that contrasting color designs retain pristine boundaries over time.
Polyurethane Cross Linked Barrier Shield
The underlying chemistry relies on high-molecular-weight polymers that react directly with surface dye residues to form an insoluble protective web. Ready for the good part? This network locks colorants within the fiber core, making the material highly resistant to color fastness issues during intensive commercial laundering.
- Apply cross-linking fixatives during the final textile rinsing and drying phase.
- Verify that chemical fixatives do not compromise the soft hand of the fabric.
- Ensure treated lots pass strict AATCC color fastness evaluation standards.
Blocking Pigment Migration in Wash
Color migration occurs when unbonded dye molecules detach from synthetic fibers under high thermal conditions and redeposit onto lighter panels. Specially treated athletic fabrics trap these volatile pigments, keeping high-contrast sublimation prints sharp and vibrant over dozens of wash cycles.
- Test dye lot stability under simulated commercial wash environments.
- Specify fixatives that resist degradation from chlorine and heavy sweat.
Key Takeaway: Color Fastness Assurance
Investing in cross-linked polymer treatments protects high-contrast garment designs from destructive color bleeding and preserves professional aesthetics over time.
+————————————————————–+
| POLYESTER FIBER MATRIX |
| ========================================================== |
| || (•) Loose Dye Particle –> [Blocked by Barrier] || |
| ========================================================== |
| POLYURETHANE CROSS-LINKED BARRIER |
+————————————————————–+
| Performance Metric | Untreated Synthetic Knit | Polymer Cross-Linked Fabric |
| Wash Fastness (AATCC 61) | Grade 2-3 (Noticeable Bleeding) | Grade 4.5-5 (Excellent Retention) |
| Crocking Resistance | Poor Under Wet Conditions | Superior Dry and Wet Performance |
| Boundary Sharpness | Bleeds into Light Inserts | Retains Pristine Color Seams |
Ensuring absolute color fastness via advanced polymer encapsulation protects your brand reputation and prevents customer returns due to muddy color blending.
6. Why Should Fabric Tension Adjustments Be Tested Frequently?
Knit structures require significantly lower tension settings than standard stable woven products to prevent severe seam distortion. This is where it gets interesting because variations in elastic fiber content between different fabric batches will alter how the machine feeds material. Failing to test tension configurations on scrap sports fabric material prior to production leads to puckered seams or loose, structurally weak stitch lines.
Preventing Puckered Polyester Seams
Excessive needle thread tension clamps down too tightly on flexible knit loops, bunching the fabric together into a permanent pucker that cannot be ironed out. You might be wondering how to find the perfect balance without creating loose loops on the underside of your panels. The solution requires systematic, incremental adjustments while checking both sides of the stitch.
- Balance needle and bobbin tensions until the lock point rests inside the fabric.
- Loosen bobbin case tension slightly if working with ultra-fine microfiber knits.
- Document exact digital tension numbers for every specific textile weight.
Managing Differential Feed Dynamics
Industrial machines and advanced home units feature differential feed systems that control the speed ratio between the front and rear feed dogs. Adjusting this ratio prevents the machine from stretching out your panels or causing them to gather unevenly during long seam runs.
- Set differential feed above 1.0 to compress stretchy fabrics slightly as they sew.
- Lower the feed ratio below 1.0 if you observe puckering on lightweight materials.
Key Takeaway: Sample Testing Protocol
Frequent tension validation on production scraps guarantees completely flat, professional seams that mirror premium retail activewear standards.
| Tension Status | Visual Appearance | Technical Corrective Action |
| Too High | Puckered, gathered seam line | Decrease needle tension; check bobbin |
| Too Low | Loose loops on fabric underside | Tighten upper tension; verify threading path |
| Balanced | Flat, smooth, elastic seam | Record parameters for batch standardization |
Establishing rigorous testing checkpoints before mass assembly prevents widespread structural defects across high-volume sportswear orders.
7. How Do You Choose Correct Grainlines for Elastic Layouts?
Pattern layout decisions directly dictate how a finished athletic garment stretches and conforms around an athlete’s body. Here’s the deal: placing pattern pieces along the incorrect grain axis can render a compression garment completely unwearable due to restricted movement. Aligning pattern layouts with the maximum direction of elongation in your sports fabric material guarantees absolute comfort, flexibility, and muscle support.
Mapping Two Way vs Four Way Stretch
Two-way stretch fabrics expand exclusively from selvage to selvage, whereas four-way stretch textiles expand both crosswise and lengthwise simultaneously. What’s the real story? Identifying the precise stretch vectors prevents design teams from misaligning critical range-of-motion panels on activewear items.
- Pull fabric samples firmly along both axes to chart stretch percentages.
- Place pattern pieces requiring maximum stretch perpendicular to the selvage.
- Utilize four-way stretch options for form-fitting compression leggings.
Aligning Maximum Extension Directions
Active human muscle groups expand horizontally around limbs during intense physical exertion and athletic training. Therefore, pattern pieces for sleeves, thighs, and waistbands must be oriented so that the fabric’s primary stretch vector wraps around the body.
- Mark the maximum stretch direction directly onto pattern templates.
- Align grainline arrows parallel to the fabric wale for stable vertical recovery.
Key Takeaway: Panel Layout Accuracy
Precise orientation of stretch axes guarantees freedom of movement for the end user while maintaining the intended compression profiles.
| Fabric Stretch Type | Primary Layout Axis | Key Garment Application |
| Two-Way Stretch | Crosswise (Selvage to Selvage) | Standard Loose Fit Training Tees |
| Four-Way Stretch | Dual Axis Alignment | High-Performance Compression Gear |
| Mechanical Stretch | Diagonal Bias Orientation | Light Performance Warm-Up Jackets |
Carefully analyzing stretch vectors prior to cutting eliminates fit issues and ensures uniform compression across all production sizes.
8. What Methods Prevent Elastic Bands from Twisting Internally?
Twisted internal elastic bands ruin garment aesthetics and cause significant physical discomfort for athletes during training. But here’s the kicker—loose elastic inside a wide waistband channel will naturally flip and roll over after just one rigorous exercise or laundry cycle. Securing elastic components firmly to your sports fabric material requires implementing industrial anchoring methods that lock internal bands into permanent position.
Anchoring Elastic Inside Waistbands
Stitching vertical anchoring lines directly through the elastic band at the center back, center front, and side seams prevents the band from twisting within its channel. Ready for the good part? This method allows the waistband to expand fully while keeping the internal elastic perfectly flat.
- Use a tight stretch stitch or bartack to secure elastic to seam allowances.
- Ensure the elastic band is cut exactly to size before anchoring.
- Match thread color perfectly to the exterior fabric to conceal anchor lines.
Row Stitching Through Activewear Bands
Multi-row parallel stitching involves stretching out the elastic band completely while sewing multiple horizontal rows across the entire length of the waistband. This creates a highly secure, professional gathered effect that is common in premium commercial sportswear styles.
- Deploy a twin needle or multi-needle machine to ensure parallel lines.
- Keep consistent tension on the elastic during the entire sewing sequence.
Key Takeaway: Waistband Integrity Tips
Implementing anchoring lines keeps internal elastic flat, enhancing user comfort and ensuring the garment retains its shape over long-term use.
| Anchoring Style | Labor Intensity | Aesthetic Result |
| Vertical Seam Tacking | Low (Fast Assembly) | Clean, smooth exterior waistband look |
| Multi-Row Topstitching | Medium-High | Sporty, gathered, high-security band |
| Stitch-in-the-Ditch Anchor | Minimal | Invisible stabilization at key points |
Integrating robust elastic stabilization techniques elevates garment construction quality and prevents frustrating band distortion.
9. Can Commercial Hemming Styles Be Replicated on Home Units?
Industrial activewear relies heavily on specialized multi-needle coverstitch machines to produce flat, flexible, raw-edge hems. This is where it gets interesting because you can easily replicate this clean look on a standard sewing unit without investing in industrial machinery. Utilizing specialized twin needle setups allows a lockstitch machine to sew dual topstitching lines while creating a flexible zigzag on the underside.
Utilizing Twin Needles for Hems
A twin needle features two separate needles mounted onto a single shank, threading into a single bobbin mechanism below the needle plate. You might be wondering how this creates stretch; the bobbin thread naturally zigzags back and forth between the two top threads, allowing the hem to expand without snapping.
- Select a stretch twin needle with an appropriate 4.0mm gap for athletic wear.
- Thread both top needles carefully, ensuring threads do not twist together.
- Loosen bobbin tension slightly to prevent a raised ridge between the stitch lines.
Maintaining Flat Unpuckered Finishes
Stretching out a hem while sewing with a twin needle creates a distorted finish known as tunneling, where fabric forms a raised ridge between the needles. Using a light stabilizer or basting tape keeps the hem perfectly flat as the needle moves through the material.
- Apply wash-away hem tape to stabilize the edge before sewing.
- Guide the fabric under the presser foot gently without pulling or pushing.
Key Takeaway: Professional Hemming Secrets
Twin needle applications enable standard lockstitch machines to finish activewear hems with excellent stretch recovery and a high-end retail appearance.
| Needle Configuration | Resulting Underside Stitch | Hem Flexibility Profile |
| 2.5mm Stretch Twin | Narrow Elastic Zigzag | Light-Medium Stretch Applications |
| 4.0mm Stretch Twin | Wide Elastic Zigzag | High-Elongation Activewear Hems |
| Single Straight Needle | Rigid Lockstitch | Non-Functional Cosmetic Edges |
Mastering twin needle threading and tension adjustments ensures clean, professional finishes on all stretch garment hems.
10. How Do Clean Finishing Techniques Improve Athlete Comfort?
Raw internal seams rub against skin during high-intensity training, creating painful chafing and blisters. Here’s the deal: premium sportswear must feature perfectly flat, soft internal profiles that protect the skin from friction. Utilizing flatlock mock seams or encapsulated seam construction techniques with soft sports fabric material ensures exceptional comfort for athletes during prolonged workouts.
Implementing Flatlock Mock Seams
True flatlock seams butt two raw fabric edges together with zero overlap, creating a completely flat connection zone. What’s the real story? You can easily simulate this clean finish on a standard machine by sewing a modified overlock stitch and pulling the panels flat.
- Press seam allowances firmly to one side before topstitching them down.
- Use soft bulk nylon thread in the loopers or bobbin for maximum skin comfort.
- Verify that the flattened seam layout maintains excellent crosswise elasticity.
Eliminating Chafing via Encapsulation
Encapsulating exposed seam allowances inside soft binding or using clean construction methods ensures that raw edges never touch the skin. This technique is highly effective for sensitive areas around sports bra bands, necklines, and high-motion underarm panels.
- Bind raw structural edges with lightweight four-way stretch binding tape.
- Ensure binding materials match the stretch profile of the main garment.
Key Takeaway: Structural Comfort Metrics
Clean internal finishes eliminate skin chafing, maximize user comfort, and position your brand as a premium apparel manufacturer.
| Seam Type | Internal Thickness | Chafing Risk Factor |
| Standard Overlock Seam | Raised Ridge (1.5mm) | High during endurance activities |
| Mock Flatlock Seam | Flattened Profile (0.5mm) | Minimal; very soft against skin |
| Bound / Encapsulated Seam | Covered Smooth Finish | Zero skin-to-fiber friction points |
Prioritizing flat seam construction techniques ensures that your activewear delivers exceptional performance under grueling training conditions.
Conclusion
Mastering the technical nuances of working with modern high-stretch synthetics allows your brand to manufacture top-tier athletic apparel that stands out in a competitive B2B market. From choosing the correct stretch needle geometry to utilizing advanced polymer cross-linked fixatives to prevent color bleeding, every adjustment is essential to ensuring overall garment longevity and performance. If you are ready to enhance your product line with certified functional knits that feature exceptional color fastness and reliable elasticity, please contact us today.
We deliver top-tier functional fabrics engineered to meet international compliance and performance standards.
Frequently Asked Questions
Q1: Can I use standard cotton thread for activewear assembly?
No, cotton thread lacks the required elongation properties and will snap when stretch garments expand under physical loads. Always select premium polyester or bulk nylon threads to ensure the seam stretches in perfect unison with the fabric.
Q2: What’s the best method to wash synthetic athletic garments?
Washing garments in cold water on a gentle cycle prevents high-temperature fiber distortion and maintains structural elasticity over time. Avoid fabric softeners entirely, as they leave a residue film that clogs breathability pores and ruins moisture-wicking capabilities.
Q3: How do I know if my presser foot pressure is too high?
If your fabric panels emerge from under the needle with wavy, rippled, or permanently stretched edges, your presser foot pressure is configured too high. Back off the pressure settings incrementally until the top and bottom fabric layers feed completely flat.
Q4: Can I iron printed performance synthetic fabrics safely?
Yes, but you must use a low heat setting and a protective pressing cloth to prevent melting synthetic polyester fibers. High direct heat destroys sublimated prints and compromises the performance attributes of technical fabrics.
Q5: What’s the best layout orientation for compression gear panels?
You must orient pattern templates so that the fabric’s axis of maximum elongation wraps horizontally around the athlete’s muscle groups. This specific placement ensures optimal muscle support and compression profiles without restricting natural range of motion.